Almost every product that we produce at Waterlox would be considered a “clear” coat. Clear is in quotes because the Tung Oil in most of our products will have some impact on the final color, so they are not perfectly clear. However, they are all intended to show off and highlight what is underneath the coating, so they are transparent.
For paint and coatings, you can have thousands of choices when it comes to colors, but there is also a decision to be made about the final gloss of your project. We do offer stain colors in our TrueTone product line, but the main focus of our products is to provide a protective clear layer. This is where some decisions need to be made when deciding which of our products to use and how to go about finishing your project.
This guide will mostly focus on film-forming coatings. Penetrating coatings will not really form a film on the surface of the wood and will almost always yield a matte, “unfinished” look. See Types of Finishes for more information. If you would like more information about specific gloss options with our Waterlox products, see our Waterlox and Gloss guide.
The Science of Gloss
When light hits a surface it can do one of four things:
- It can reflect off the coating (gloss)
- It can pass through the coating (transmission/clarity)
- It can reflect inside the coating (haze)
- It can be absorbed (heat)
Gloss is defined as a superficial luster or shine. It is an optical property that indicates how well a surface reflects light in a specular (mirror-like) direction. Basically, higher gloss means that the light reflects very evenly over the surface all in the same direction (think of a mirror). Lower gloss is achieved by making the light scatter in all different directions (diffuse reflection). When light hits a surface some of it is reflected back at us and we perceive this reflection as gloss. The easiest and most common way to alter gloss is to change the surface texture and this is usually done on the microscopic level. The smoother a surface is, the more light that is reflected directly back at you and the glossier this will appear. If the surface is rough (on a microscopic level), it will scatter the light in all different directions and less of it will be reflected directly back at you, the observer. This will appear lower in gloss.
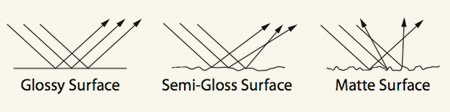
Figure 1: Light Reflection and Gloss
A good example of this would be a sheet of tin foil. When it is perfectly flat and smooth, it has a mirror like shine. If you crumple it up and then flatten it out, it will appear much lower in gloss. This also helps to demonstrate another property called “distinctness of image”. The clearer the reflection is in a surface, the smoother the surface must be and it will appear higher in gloss. In Figure 2 below, you can see the pattern in window muttons clearly in the glossy section on the right, and it is more distorted in the lower gloss middle section and barely recognizable in the matte section on the left.
Figure 2: Distinctness of Image (DOI)
One side effect of lowering the gloss is that it typically increases the haze. As you increase haze, you lose some clarity in the coating, more specifically, what you see through the coating surface. Higher gloss tends to highlight more of the wood characteristics where lower gloss will hide minor differences easier. This is caused by light scattering within the film surface. As you can see in Figure 1, when light hits the sides of the troughs, it can be reflected back into the coating.
Changing Gloss
Gloss is essentially a physics theory as it has to deal with how the light interacts with the physical surface. Manipulating that surface can either be done by physical, destructive means (buffing/polishing) or through chemical, additive means.
Mechanical Gloss Manipulation
Regardless of the coating used, you can manipulate the final gloss by sanding, buffing and polishing. There are a lot of products and methods dedicated to this science, so this guide will not go into a lot of detail. The goal of these processes is all the same and that is to set the final surface profile to either scatter the light (lower the gloss) or make it more uniform (raise the gloss). The basic plan is that a coarser grit product (steel wool, pumice stone, sand paper, buffing pads, etc.) will lower the gloss and gloss will rise as your grit becomes finer and finer. A few things to consider when mechanically changing your gloss are sanding/swirl marks, removing too much material and creating too much heat. It is important to follow proper grit sequences to ensure that you are always removing the evidence of the more coarse grits. Failure to do so may leave swirls or sanding marks in your finish. You also do not want to start at too coarse of a grit, so that you are removing a lot of material, as you may reduce the amount of protection that your coating can provide if it becomes too thin. Lastly, most of these procedures should be done by hand or careful attention needs to be paid to prevent heat buildup. Overheating a fresh surface can cause the finish to melt and be “pulled” as opposed to “cut” which just means more work to remove the melted balls of finish.
Chemical Gloss Manipulation
The most important part of a coating product is to provide protection to the surface that you are coating. A main “resin system” is considered the main core of the formulation. This can be a urethane acrylic, resin-modified tung oil, linseed oil-urethane, oil-wax, raw tung oil, etc. This resin system is then modified with additives to achieve certain properties such as final aesthetics, ease or method of application and storage/shelf-life. Some of the most common additives for decorative coatings are what are called matting or flattening agents. Their goal is to flatten or lower the gloss of a certain coating.
Most “resin systems” will generate a high gloss coating without any additional “help”; therefore, that system is further modified with flattening agents to lower the gloss. This is typically done with the addition of a particle that disrupts the surface of the dry film as seen in Figure 3 below. As the film dries, solvent leaves and the film shrink-wraps around the particles. If you watch the coating dry, you can see it transition from the wet, glassy look to low gloss as the solvent leaves the system and the flattening agent becomes exposed.
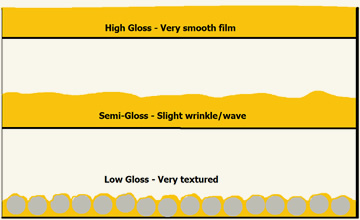
Figure 3: Surface Texture for Gloss Levels
A careful balance needs to be considered when formulating and choosing a coating for a specific purpose. Final gloss is usually the biggest driver in the decision-making process for consumers; however, when the other factors are not considered properly, it can have a negative effect on your final product. Usually lowering the gloss will lead to a hazier coating and will also reduce clarity.
Gloss Considerations
Usually the driving factor for selecting a certain gloss level over another is purely based on design and personal preference. If you are unsure about which level you may want there are some pros and cons. These are generally going to be very minor, but may tip the scales in favor of one vs. the other.
- Scratches – Lower gloss finishes contain higher amounts of flattening agent. This additive has the side effect of improving mar and scratch resistance typically. Also, because it is already lower in gloss, they tend to hide scratches a little better.
- Touch ups – Higher gloss finishes are usually easier to touch up. Your new coating will usually be slightly different in gloss as you have a new smooth surface formed. These slight differences are usually less noticeable at a higher gloss value. Hypothetically, assume the repair is 5 gloss units higher. If the surrounding gloss is 85 gloss units (high gloss), that 5 unit difference is about 6%. If the surrounding gloss is 10 (matte), that difference is 50%! You may be able to blend in a spot repair on a gloss or semi-gloss finish, but you’ll typically want to recoat an entire section or area for matte and satin finishes.
* The caveat is for penetrating finishes as mentioned at the beginning of the document.